
Website is an essential tool for any modern business, including coffee shops. By having a website, your coffee shop can reach a wider audience, provide convenient access to your products and services, and build strong relationships with customers.
Having a website provides your coffee shop with an online presence that can be accessed by anyone with an internet connection, regardless of their location or time of day. This means that potential customers can find your coffee shop and learn about your products and services, even outside of your regular business hours.
A website can help build brand awareness for your coffee shop. It allows you to showcase your coffee shop’s unique qualities and values, and provide a glimpse into your establishment’s atmosphere and culture.
A website is also an excellent tool for marketing and promotion. You can use it to promote your coffee shop’s products and services, offer special promotions, and engage with your customers through a blog or social media integration.
A website can also make it easier for customers to order coffee online, schedule catering services, or view your menu.
Ultimately, a website can lead to increased sales and revenue for your coffee shop by reaching a wider audience, providing convenient access to your products and services, and offering an online platform to build customer relationships.
And you won’t need to pay big money to an agency or freelance designer who will do that for you. You can have a professional-looking coffee shop website in less than one hour.
If this sounds interesting, continue reading as I will reveal all the details step by step.
Step 1: Choose a Domain Name
Domain name is the web address people will use to open your blog in an Internet browser. The domain name is often related to the topic you will write about.
Choosing a domain name is an important step in creating a website, as it will serve as the web address for your site. Here are some tips to help you choose a good domain name:
- Keep it short and easy to remember: A shorter domain name is easier to type, remember, and share with others. Try to keep your domain name to 2-3 words if possible.
- Make it brandable: Your domain name should reflect your brand and be unique enough to stand out from the competition. Avoid generic words or phrases that could be confused with other businesses.
- Use relevant keywords: Including relevant keywords in your domain name can help with search engine optimization and make it easier for people to find your website.
- Avoid numbers and hyphens: Numbers and hyphens can make a domain name harder to remember and can lead to typos when typing the URL.
- Choose the right domain extension: Consider the purpose of your website and choose the appropriate domain extension. For example, “.com” is a good choice for commercial websites, while “.org” is typically used for non-profits and organizations.
- Check for availability: Before settling on a domain name, make sure it’s available by doing a search on a domain registrar’s website. You may need to come up with a few options in case your first choice is already taken.
Remember, your domain name is an important part of your brand and online identity, so take the time to choose a name that will serve you well in the long term.
Step 2: Hosting
Hosting refers to the process of storing a website, web application, or other digital content on a server or other computer system that is connected to the internet, and making it accessible to others on the web. When a user types in a website address or URL, the hosting server delivers the web pages or content to the user’s device.
Hosting services are typically offered by web hosting companies, which provide space on their servers and offer various features and tools to help users manage their websites, such as email accounts, databases, and website builders. There are several types of hosting, including shared hosting, dedicated hosting, VPS hosting, and cloud hosting, each with its own benefits and drawbacks.
Step 3: Install WordPress
- Choose a hosting provider: To install WordPress, you will need a web hosting provider. There are many hosting providers available, such as Bluehost, HostGator, or SiteGround. Choose a provider that meets your needs, budget, and preferences.
- Choose a hosting plan: Once you’ve selected a hosting provider, choose a hosting plan that meets your needs. Many hosting providers offer different hosting plans, such as shared hosting, VPS hosting, or dedicated hosting.
- Choose a domain name: If you don’t have a domain name yet, choose one that is relevant to your website or business. Most hosting providers offer domain registration services, so you can register a domain name directly through them.
- Install WordPress: Most hosting providers offer a one-click installation process for WordPress. Log in to your hosting account, and look for an option like “Install WordPress” or “WordPress Installer.” Follow the on-screen instructions to install WordPress on your website.
- Set up WordPress: Once WordPress is installed, you can log in to your website by going to your domain name and adding “/wp-admin” to the end of the URL. Log in with the credentials you set up during the installation process. From there, you can customize your website, install themes and plugins, and start creating content.
Step 4: Install and Activate The Astra Theme
To get started, you’ll need to install the Astra theme on your WordPress site. You can do this by going to the “Themes” section in your WordPress dashboard, clicking “Add New,” and then searching for “Astra.” Once you’ve found the Astra theme, click “Install” and then “Activate.”
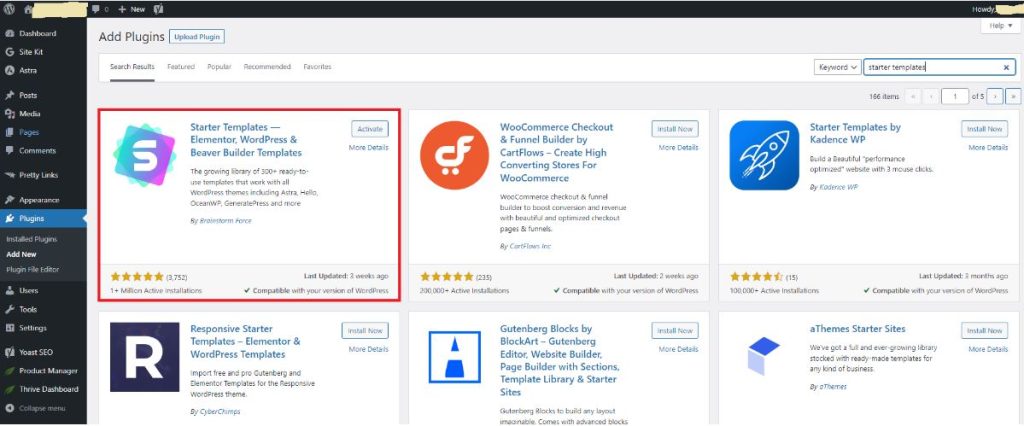
Step 5: Install and Activate The Astra Starter Templates plugin
Astra offers a free plugin called Astra Starter Templates that gives you access to a library of pre-built templates. To install this plugin, go to the “Plugins” section in your WordPress dashboard, click “Add New,” and then search for “Astra Starter Templates.” Once you’ve found the plugin, click “Install” and then “Activate.”
Step 6: Choose a template for your Coffee Shop
Once you’ve installed and activated the Astra Starter Templates plugin, you can browse through the available templates by going to “Appearance” > “Astra Starter Templates.” You can filter the templates by category, such as “Agency,” “Portfolio,” or “E-Commerce.”
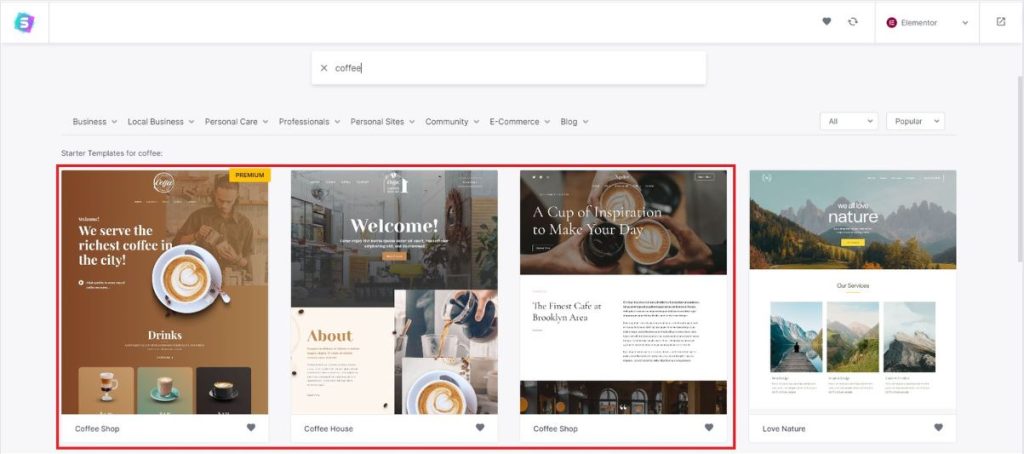
Step 7: Import the template
Once you’ve found a template you like, in this case one of the three available “coffee” templates, click on the template and follow the on-screen instructions. The plugin will then download all the necessary files and set up the template for you. Depending on the size of the template, this process may take a few minutes.
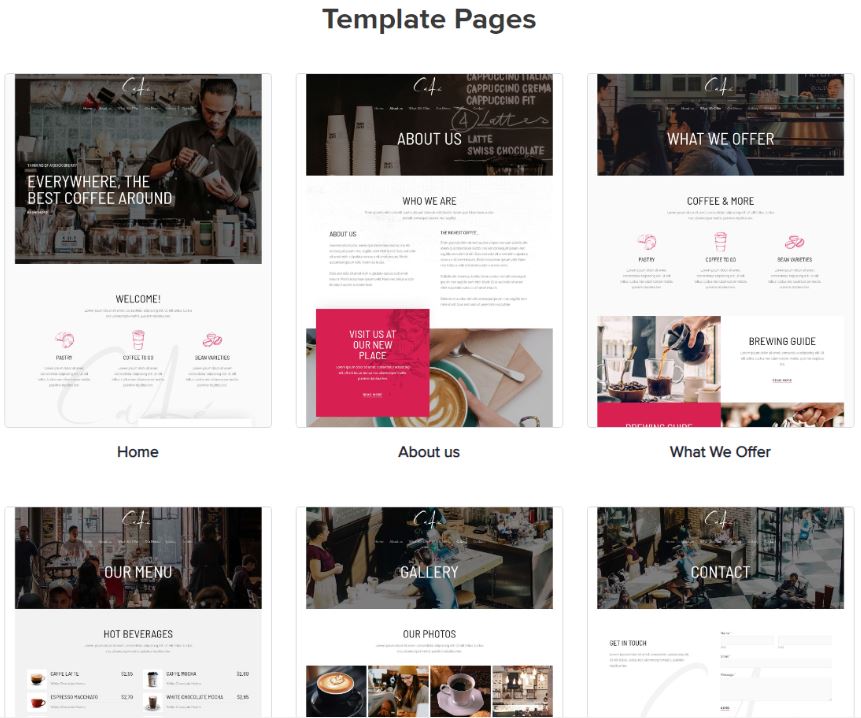
Step 8: Customize the template
Customize the template: After the import process is complete, you can customize the template to your liking by adding your own content and tweaking the design. Astra offers a variety of customization options through the WordPress Customizer, including colors, typography, layout, and more.
Here is an quick explainer video how to install and customize the starter template: